HYIP monitors are source of providing visitors to HYIP sites and their admins pay handsome amount to the HYIP monitor's admins. As this business is growing fast. One can build his own HYIP monitor website by following simple steps. We will explain how to make a monitor website in the next tutorial. We will explain how to make websites for hyip monitoring step by step without leaving no step.
The procedure for creating listing/adding new hyips into your monitor website:
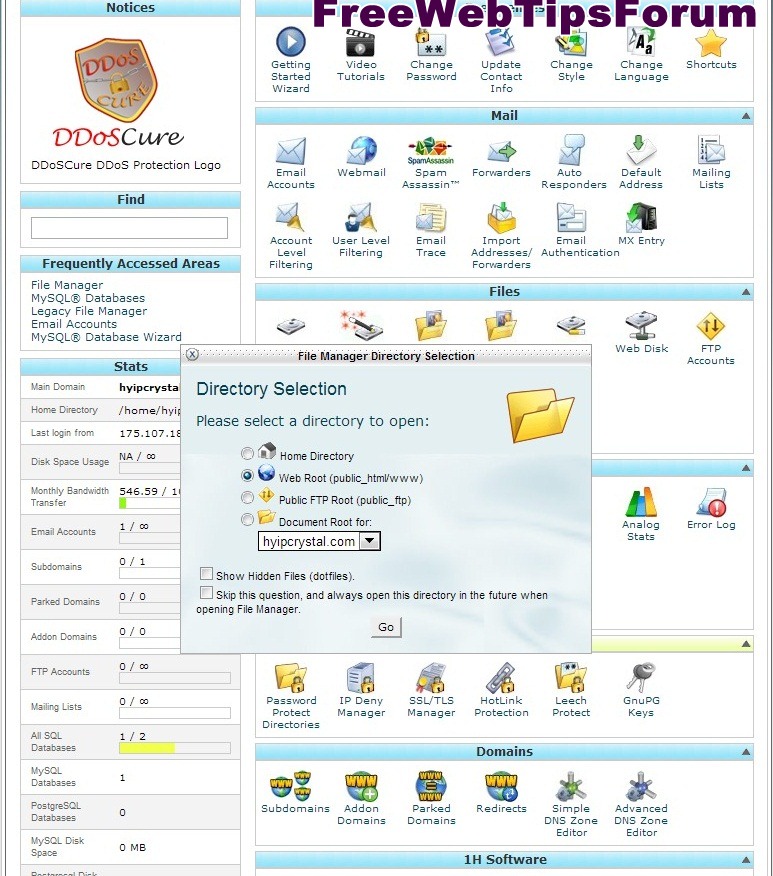
1. Open your website like, https://www.yoursite.com/admin.php

2. Now write user name as admin, password, captcha.

3. After step 2 and enter you will see the following window:

4. Click on Listing and you will see the following window:

5. Click on Add Listing and a new screen will be open as such this:

6. Click on exclusive and select Normal (some monitors have diamond, gold, silver, trial, etc, choose according to your monitor categories). Status “ON”, Paying Status as “Waiting”.

7. Make an account in HYIP Company which you select from (for example allmonitors.net) any monitor website. Copy affiliating URL and paste it into URL space. Write the name of that company at top of this. Copy/write the Plan of this company in “percents”. Now write minimum/maximum amount to be invested/spend and percentage of referral commission in “referral”. Support email, support form, contact email (only one contact is sufficient like support form, you can leave rest of support email/contact email).


How to Add Image of HYIP into Monitor Website?
After Creating Listing now we are going to add image of this company into our monitor.
1. First of open Photo Scape/ Adobphoto shop ( we will discuss photo scape). Download photoscape and Install it. Click on photoscape and window will appear:

2. Before Click on capture image open the site of company. Then after click on capture image you have to select (by press left side of mouse and keeping holding) the whole region of company (some monitors select only logo of this company this is your own choice). When you leave pressing the image will show in photoscape.

3. Click on resize and select the size width:120px, the height will adjust automatically. Then click on “OK”. Now save it as JPEG and Write the name as number of your listing (lid) i.e., 157.jpeg


Upload File into cPanel
4. Now there are two ways of uploading this image into your cPanel. The First one is Open your cPanel>>file manager>>root (public_html)>>public_html>>images>>shots (shots folder can be vary from monitor to monitor, so select according to your monitor)

5. Click on “upload” at this window. A new window will open and click on brows select the image i.e.,157.jpeg

Upload File into Filezilla
6. Second way is download filezilla. Install it and open its window.
7. Write host name [yoursite.com], user and password [cPanel’ user name and pass word]. Select public_html>>images>>shots and simply write the direct path as /public_html/images/shots

8. Now drag the image of company (157.jpeg) into shots (in file zilla).
Image

After following all the steps now your listing is complete will look like this one. We will explain how to make a monitor website in the next article.

1 comments:
nice work to elaborate hyip monitor website listing..
Post a Comment