Business websites, blogs, photography websites, online stores, affiliate websites, membership websites and more would be made after reading these posts regularly. Follow these steps on daily basis.
Now we move to the process of creating your website, low cost and best designed website with free tutorials. As this process is long enough to explain in single article so we will continue articles step by step to achieve our target for creating web.
Select Domain Name and Web Hosting
This is important part of your business plan that you have to choose best domain name and hosting.1. First go to Hostgator.
2. Click the button View Web Hosting Plans.
3. Select Baby Plan because it allows you to host many websites and it's the low cost one. If you have only one website, then select Hatchling Plan. you can upgrade your plan whenever need to host another website.
4. In Billing Cycle select 1 month@7.95/mo (price can vary) as hostgator have different billing cycles. The advantage of selecting monthly billing cycle is you can switch to another hosting compny without waiting for long time according to your billing cycle.
5. Click the button Order Now.
6. Write your website name ( also
called a domain name), into the domain checking box.
Try to buy a .com unless someone has already taken that website name and unfortunately it’s not available for you.
Please Note That:
HostGator will also suggest variations of your domain name, such as YourWebsite.co.uk or
YourWebsite.biz.
Actually:
.com is for commercial/business
.net is for network
.org is recommended for non-profits
.edu is for school/university
.gov is for government
.biz is also for business
7. Again Confirm the Package Type you’ve selected and billing cycle.
8. Now for Hostgator, Create a username and security PIN.
9. Type in your billing information. You can select credit cards and you can also pay
with PayPal.
10. There are additional Add-ons available for purchase and we not recommended to purchase these. As SiteLock is checked by default and we suggest unchecking it to save your money.

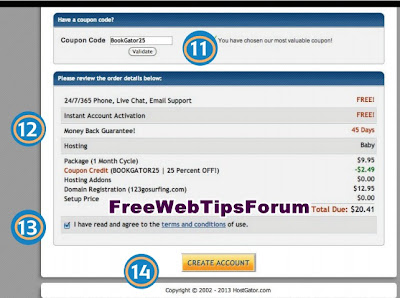
11. You can enter coupon code ( BookGator25) and get 20% off of the actual price of plan.
12. Again make a review for all the information you've selected.
13. Finally, check the box: "I have read and agree to the terms and conditions of use".
14. Click the button Create Account.
Installation and Settings of WordPress in cPanel
Now we are moving towards the settings and installation of Wordpress so that we can start building a website. After creating account, you should have received an email from HostGator. This email contains important information about your website so keep it safe and confidential.
1. Now Login to your email inbox and find
the email from HostGator.
2. Write down your Username and Password.
3. In the email from HostGator, click the link for Your Control Panel .

4. Write the Username given in the email.
5. Copy & paste (or type in) the Password provided in the email.
6. Click the button Log In.

7. Scroll down to the Software/
Services section.
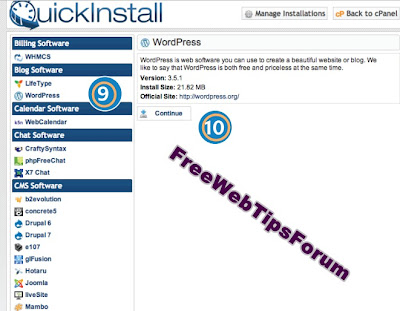
8. Click the icon QuickInstall.

9. In the Left side Menu, find the Blog Software and click the icon Wordpress.
10. Click the button Continue.

11. In the Install Wordpress, select your website name from the drop down list and the box to the right of your website name is left blank—It is VERY important!

12. Provide (type in) your details:
• Leave the box "Enable Auto Upgrades" checked.
• Type in your Admin email address.
• write your Blog Title (Don’t worry about this as we can make change in it later).
• Choose an Admin User. You will use this user name to login to WordPress.
• Write your First Name and Last Name.
13. Click the button Install Now.
14. Write down or Copy your
Username and Password. This will be emailed to you, but for safe side you’ll need a copy.
15. Finally, click the word (here), which is actually a link to visit your website.
Note That:
Any new website take up to 3 hours to start proper working. Usually everything works out accurately within 2-3 hours, but if after 24 hours you can't see your own website, send email, do a live chat, or call to hostgator's technical support. Whenever you've got website online, then start to make some changes according to your desire.
Take a look to your website www.yourwebsite.com and you should see a simple-looking very simple website. It's time to pleasure that you have made yourself a website and save your money.
Important:
We will explain installation of theme in wordpress, Adding and editing web pages, use of plugins, in order to make your website good looking, attractive and meaningful . To do this please continue reading....


0 comments:
Post a Comment