After acquiring domain name, hosting and simple website. Now we make changes to obtain desire business products or target. We will select a theme for business. Now in order to install wordpress theme, we have to visit admin control panel of your website to do this follow the steps:
1. First go to www.YourWebsite.com/wp-admin

2. A window will appear and you will see a login page. Type in the Username and Password from the QuickInstall page (Step 14 of section 'installation of wordpress' in article
"create your wordpress website step-by-step"). It should be in your email as well. Click on Log In

3. After logging in, now you're at Dashboard page. Let's the magic start here--you will make all of your
edits and changes to your website pages!

1. Click on Users on the Admin Menu/Left-side tool bar.
2. Click on your Username.

3. Type in your new password in both boxes. Caution! First write down your desire password then copy & Paste it here.
4. Press Update Profile to save the changes.
Great work! When you visit to YourWebsite.com/wp-admin (Dashboard login window), use the new password.

Note: When we’re finished to create our website, we’ll again turn caching on so that our website run and loads faster.
1. Click on Settings
2. Select WP Super Cache.
3. Click on the Easy tab.
4. Check the Caching Off.
5. Click the Update Status button .

After doing this all updates will be visible on your website! However If you are still facing problems, disable caching by doing the following:
6. Click on Plugins
7. Find the plugin Wp Super Cache and select Deactivate.
Note That:
If you're unable to see Wp Super Cache in the Settings section, you don’t worry about turning off caching as you don’t have a caching plugin. If for some reasons you are still facing issues, select delete for this plugin.

As this tutorial is step-by-step, we will be leading you through installation of a theme that looks and works great. The only thing to remember is that you have access to thousands of wordpress themes, and once you install first theme, you’ll also be able to install any other theme!
When we make changes in the theme, we see that the overall design of the website will convert from:


For above job we will follow these steps;
1. From the Dashboard, select
Appearance and click on Themes.
2. Then, click on the Install Themes tab.
3. Now write local business in the search box.
4. Click the Search box .
5. When you find the Local Business
theme, click on Install Now.

6. Now Activate the theme.

Congrats! You've just installed your new theme! To see your website, visit your URL (www.YourWebiste.com) it should look something like this:
Now you can see, you have only two pages (home and sample page), but the design of your site has complete looking good. Let's make it customize and look like professional work.

First add an About Page.
1. Click on Pages on the Admin Menu.
2. Select Add New.

3. Type a title for your page, that is About for our tutorial.
4. Click the Publish button .
 Visit your website and look at the Menu to see About page. Click on it and you'll see the page is totally blank. Now we move to add some text in it.
1. Click on Pages.
2. Find About and Select About or click on Edit.

In this box, you can use most of the options that you’d do in Microsoft Word or in any other word processing program.
 4. For the rest of the sections, select the Kitchen Sink button if it is not selected.
You can use your mouse to rollover each button on the bar just above the text box to find Kitchen Sink.

To add a title or heading on the page follow these steps:
5. Fist, highlight the text you want to make a title.

6. Click on the drop down box which shows Paragraph and select Heading 1.

8. Click over the Add Media button.

9. Click the Select Files button .

10. Find the file on your computer which you want to add, select it and click Open (it might say ok).

11. Now we will make some changes in the settings for the picture you’ve just inserted.
11a.) In Alignment, choose Left. It moves the image to the left of the text. You can also choose Right or Center of your own desire.
11b.) Where it says Link To, select None. You can also link your website here. When somebody clicks on the actual image it doesn’t link to another page.
11c.) For Size, choose Medium - 300x 225.
12. Click the Insert into page button.

Note That:
If someone clicks on the image it will go to a larger version of the image, but we don’t want that because we don’t want to lead visitors away from the page.
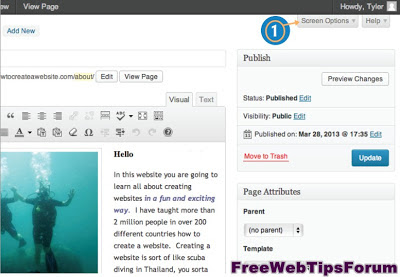
13. Click on Update and click on View Page to see your new page!

14. This is your ABOUT page of your website. In this page you can see quotation, you can add this into about page just like adding quotes in Microsoft word.

15. Highlight the text you want to link.
16. Click the link button.

17. A new window (pop-up) will appear, you’ll enter a URL to the page you want to link to. (http://www.Add-The-Website-To-Link-To-Here.
com). Don’t forget to write the http:// part of the URL.
18. Click Add Link button and then click on update.
Now click view page button and then click on that selected word to which you've linked. Then your
link to surf back to the home page.

Note: If you choose to allow comments on any of your pages, there can be a high amount of spam comments, so removing comment boxes is highly recommended and useful. To do this first go to Pages and select the page you want to edit.
1. On the top right of your screen click Screen Options button.
2. Next check off Discussion box, which makes a new box appear below.

3. Scroll down until you see the Discussion box and unchecked Allow comments and Allow trackbacks.
4. Click the Update button. Now your page is free from comment-box!


To remove/delete the sidebar, first of all go to Pages and selected the page you want to edit.
1. Under Templates section choose Full Width Page in the drop down box.
2. Click the Update button.

Now visit your website and take a look at your about page. It should now be a full width page without the any sidebar!
Note:
We have edit only one page and discuss some features. We will explain how to edit your home page, adding and editing pictures, how to use plugins, how to change footer, in next articles. Please continue reading.......
1. First go to www.YourWebsite.com/wp-admin

2. A window will appear and you will see a login page. Type in the Username and Password from the QuickInstall page (Step 14 of section 'installation of wordpress' in article
"create your wordpress website step-by-step"). It should be in your email as well. Click on Log In

3. After logging in, now you're at Dashboard page. Let's the magic start here--you will make all of your
edits and changes to your website pages!

Changing Password in Wordpress Admin Panel
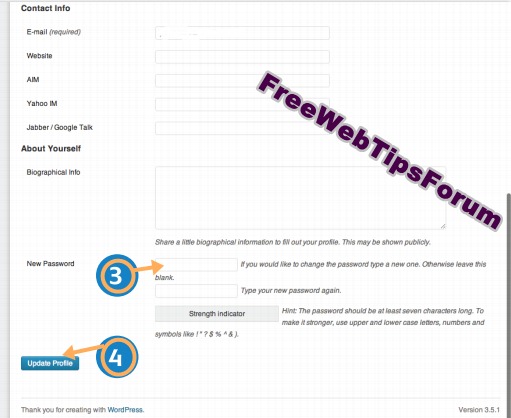
The password assigned during quickinstall is long and hard to remember. Now we are going to changed it to more memorable.1. Click on Users on the Admin Menu/Left-side tool bar.
2. Click on your Username.

3. Type in your new password in both boxes. Caution! First write down your desire password then copy & Paste it here.
4. Press Update Profile to save the changes.
Great work! When you visit to YourWebsite.com/wp-admin (Dashboard login window), use the new password.
How to Turn Off Caching?
Caching helps out your website to load faster by saving a quick-loading version of website. The drawback of caching is that it does't show your website’s recent updates/changes. To avoid this bad thing, we turn off caching so that whenever we make edits we are able to see the changes at the instance.Note: When we’re finished to create our website, we’ll again turn caching on so that our website run and loads faster.
1. Click on Settings
2. Select WP Super Cache.
3. Click on the Easy tab.
4. Check the Caching Off.
5. Click the Update Status button .

After doing this all updates will be visible on your website! However If you are still facing problems, disable caching by doing the following:
6. Click on Plugins
7. Find the plugin Wp Super Cache and select Deactivate.
Note That:
If you're unable to see Wp Super Cache in the Settings section, you don’t worry about turning off caching as you don’t have a caching plugin. If for some reasons you are still facing issues, select delete for this plugin.

Installation of Wordpress Theme
A theme is actually the design of your website. The fabulous thing about WordPress is that there are 1000’s of free of cost themes (designs).As this tutorial is step-by-step, we will be leading you through installation of a theme that looks and works great. The only thing to remember is that you have access to thousands of wordpress themes, and once you install first theme, you’ll also be able to install any other theme!
When we make changes in the theme, we see that the overall design of the website will convert from:

Looking to:

For above job we will follow these steps;
1. From the Dashboard, select
Appearance and click on Themes.
2. Then, click on the Install Themes tab.
3. Now write local business in the search box.
4. Click the Search box .
5. When you find the Local Business
theme, click on Install Now.

6. Now Activate the theme.

Congrats! You've just installed your new theme! To see your website, visit your URL (www.YourWebiste.com) it should look something like this:
Now you can see, you have only two pages (home and sample page), but the design of your site has complete looking good. Let's make it customize and look like professional work.

Adding Pages in Your Website
Important work is that how can we add Pages to our website. For example to understand we will only create an About Page. You can easily create and delete other pages as needed. Now we’ll add a blank page without any content, and then we’ll customize it by making some changes in it.First add an About Page.
1. Click on Pages on the Admin Menu.
2. Select Add New.

3. Type a title for your page, that is About for our tutorial.
4. Click the Publish button .

Editing Pages in Website
In this section we will have to learn about adding text, adding Titles, adding pictures, adding links and much more.
1. Click on Pages.
2. Find About and Select About or click on Edit.

Adding Text
In this section we'll see how can we insert text/content into any page but for our work in about page
3. Click inside the text box and start typing. You create new paragraphs by pressing enter from keyboard. In this box, you can use most of the options that you’d do in Microsoft Word or in any other word processing program.

You can use your mouse to rollover each button on the bar just above the text box to find Kitchen Sink.

Adding Titles
You may need to make different sections, or create titles for the breakup the text of your website. There are six options for heading, largest heading is Heading 1 and the smallest heading is Heading 6.To add a title or heading on the page follow these steps:
5. Fist, highlight the text you want to make a title.

6. Click on the drop down box which shows Paragraph and select Heading 1.

Adding Pictures in Pages
7. Click with your mouse wherever you’d like your picture to display. In our case, I’ve clicked my mouse just before the Hello word.8. Click over the Add Media button.

9. Click the Select Files button .

10. Find the file on your computer which you want to add, select it and click Open (it might say ok).

11. Now we will make some changes in the settings for the picture you’ve just inserted.
11a.) In Alignment, choose Left. It moves the image to the left of the text. You can also choose Right or Center of your own desire.
11b.) Where it says Link To, select None. You can also link your website here. When somebody clicks on the actual image it doesn’t link to another page.
11c.) For Size, choose Medium - 300x 225.
12. Click the Insert into page button.

Note That:
If someone clicks on the image it will go to a larger version of the image, but we don’t want that because we don’t want to lead visitors away from the page.
13. Click on Update and click on View Page to see your new page!

14. This is your ABOUT page of your website. In this page you can see quotation, you can add this into about page just like adding quotes in Microsoft word.

Inserting Links
You can create link with any word or phrase so that when somebody make click it open in other page. Adding a link is very easy. Let’s add a link to the our homepage:15. Highlight the text you want to link.
16. Click the link button.

17. A new window (pop-up) will appear, you’ll enter a URL to the page you want to link to. (http://www.Add-The-Website-To-Link-To-Here.
com). Don’t forget to write the http:// part of the URL.
18. Click Add Link button and then click on update.
Now click view page button and then click on that selected word to which you've linked. Then your
link to surf back to the home page.

Removal of Comment Box
Wordpress automatically includes a comment box when you create a new page. As you may not want visitors to comment on every page. It’s good to know how to delete comments box from your pages like about, contact, etc.Note: If you choose to allow comments on any of your pages, there can be a high amount of spam comments, so removing comment boxes is highly recommended and useful. To do this first go to Pages and select the page you want to edit.
1. On the top right of your screen click Screen Options button.

2. Next check off Discussion box, which makes a new box appear below.

3. Scroll down until you see the Discussion box and unchecked Allow comments and Allow trackbacks.
4. Click the Update button. Now your page is free from comment-box!

Removal of Sidebar
Wordpress automatically includes a sidebar on the right side of your pages. When we remove the sidebar, it will only vanish for the actual page we are editing. Repeat these steps for each and every page that you don’t want to see a sidebar.
To remove/delete the sidebar, first of all go to Pages and selected the page you want to edit.
1. Under Templates section choose Full Width Page in the drop down box.
2. Click the Update button.

Now visit your website and take a look at your about page. It should now be a full width page without the any sidebar!
Note:
We have edit only one page and discuss some features. We will explain how to edit your home page, adding and editing pictures, how to use plugins, how to change footer, in next articles. Please continue reading.......
1 comments:
very nice effort to elaborate installation of wordpress themes. (o)
Post a Comment